Home Screen

You can navigate to most features within the app from Home.

The information displayed on the home screen is:

  • Shift information for today
  • Reporting Late
  • Reporting Sick
  • Shift information for tomorrow
  • Supervisor information
  • Time Off
  • Trades
  • Notifications

By clicking on any of these areas, you will be directed to the area of the app that is relevant.  You can also do this by using the menu bar (three lines on top left corner).

Schedule

When the schedule has been published by your organization within Genesys WFM, you will be able to view your schedule.

From Home screen:

  1. Select Today or Tomorrow.
  2. You will be taken to that day’s schedule.

From Menu:

  1. If you select from the menu, the current month is shown.
  2. At the bottom, the shift time information of the current day is shown.
  3. Days with a blue circle contains a scheduled shift.
  4. Days with a green circle contains a day off.
  5. Select a specific day.
  6. The detailed shift information of that day is shown.
  7. At the top, you can navigate through the week.

Daily view:

Monthly view:

Late

To report late 

  1. From the Home screen select I’ll be late.
  2. Choose the number of minutes you will be late.

To extend late 

  1. If you need to further extend how late you will be, select Extend Late.
  2. Choose the number of minutes how much later you will be.

I am here 

  1. When you arrive at work and can start your shift, select I am here.
    NOTE: If you do not select the I am here button, after the number of minutes you reported late, the I am here button will disappear. If you need to further extend how late you will be, select Extend Late.

Sick

To report sick:

  1. From the Home screen select I’m sick.
  2. Select the date you are reporting sick.
  3. Click Proceed.
  4. If you are reporting sick for today, then you can select the Full day selector (yes/no). If you do not require a full day, then you need to enter a start and end time for a part-day sick.
  5. Click Send.
  6. NOTE: If you are selecting any other day, that is not today, then you can only enter it as a Full Day sick.
  7. In your schedule you will see that you have a red circle on the day you reported sick in the monthly view, and you will see Sick day entered in the daily view.

Preferences

The Preferences view consists of 2 areas which can be found at the bottom of the screen:

  • Preferences
  • Availability Patterns

You will be able to see any preferences you have set for the day you selected.


To configure Availability Preferences in the app:

  1. Under the Preferences section, select a preferred day in the calendar and click on the “+” button at the top.
  2. Choose the Availability preference type.
  3. Check if the date is correct, based on your first selection.
  4. Select the availability start and end time.
  5. If the end time falls within the next day, select the slide Next day.
  6. You can add a comment by clicking in the Comments field (this is optional).
  7. Select Send.
  8. In the calendar a red circle will appear. The details of the availability are shown.
  9. The status can be (grey) Preferred or (green) Scheduled.

To configure Shift Preferences in the app:

  1. Under the Preferences section, select a preferred day in the calendar and click on the “+” button at the top.
  2. Choose the Shift preference type.
  3. Check if the date is correct, based on your first selection.
  4. Select the preferred shift (Shifts are configured in Genesys WFM).
  5. Select the preferred shift start and end time (this will default to the shifts configured start and end time).
  6. If the end time falls within the next day, select Next day.
  7. You can add a comment by clicking on the comments line (this is optional).
  8. Select Send.
  9. In the calendar a red circle will appear. The details of the availability is shown.  The status can be (blue) Preferred, (Purple) Granted or (purple) Declined.

To configure Day Off Preferences in the app:

  1. Under the Preferences section, select a preferred day in the calendar and click on the “+” button at the top.
  2. Choose the Day Off preference type.
  3. Check if the date is correct, based on your first selection.
  4. You can add a comment by clicking in the window.
  5. Select Send.
  6. The status can be (light green) Preferred, (dark green) Granted or (red) Declined.

When you have set a preference in the Preference menu you are able to copy this preference:

  1. Select a day on which you have set a preference.
  2. Click on Copy.
  3. In the next screen you can select a date range from-to to where you can copy the single day preference.
  4. At the bottom of the screen you can select the particular days within the date range to where you can copy the preference.
  5. For example: You have set a shift preference on the 14th of August. You want to copy this preference for remaining months on every Monday. You will set the dates as follows, from 1st September to 31st December. Then slide the button to green for Monday.
  6. Click on Send and the shift is copied over to all the Mondays for the remaining months.

Before you can set an Availability Pattern you need to create one:

  1. From the Preferences view, click on Availability Patterns at the bottom right.
  2. Click on “+” .
  3. Enter the name of the pattern in the Description field.
  4. Select a start and end time for each day.  If applicable, slide the button for Next Day.
  5. Click on Send.

Once you have created an Availability Pattern under the Preferences view you can apply it to the dates you want the pattern to cover:

Apply Availability Pattern:

  1. Search for the Availability Pattern you want to use.
  2. Click on Apply behind the specific Availability Pattern.
  3. Select a date range to where you want to apply the pattern.
  4. Click on Apply.
  5. When you navigate to the applicable date you will see the preference is set in the calendar.

Delete Availability Pattern:

  1. Select the Availability Pattern you want to delete.
  2. Scroll down to the bottom and click on Delete.

Shift Trades

To request a personal trade you must follow the steps below:

  1. Select a specific day within the calendar.
  2. The detailed shift information of that day is shown.
  3. Scroll down and select Show agents scheduled with me – more details on the next page.
  4. The names of your colleagues are shown.
  5. Agents withbehind their names are available for a Personal Trade request.
  6. Click onnext to the agent’s name.
  7. Select the date(s) for which you want to request a trade.
  8. Select Personal as Trade type.
  9. The name of the agent is displayed.
  10. 1Add a comment (optional).
  11. Slide the button to green if you want to manually approve the request after the agent has accepted your trade request. If you don’t select this option, the trade is either approved automatically by the system or manually approved by the Supervisor.
  12. Click on Send.

When making a trade, you can view the other agent’s schedules to decide who to trade with.

View schedules for other agents are only available when:

  • The organization allows you to view the schedules from other agents.
  • The agent has not enabled the setting of “Hide my schedule” from other agents.

View other agents schedules:

  1. Select a specific day in the calendar.
  2. Scroll down and select Show agents schedules.
  3. The names of your colleagues are shown.
  4. Select one colleague and the details of their shift are shown.

To request a community trade you must follow the steps below:

  1. Select a specific day within the calendar.
  2. The detailed shift information of that day is shown.
  3. Click onbehind the date.
  4. Select the date(s) which you want to trade.
  5. Select Community within the Trade type.
  6. Add a comment.
  7. Click on Send.

In the Trade menu you are able to view the Trade proposals you have requested:

  1. The requested trades are shown under My (at the bottom of the screen).
  2. In this screen, the different trades you have requested are displayed with the shift time and date information.
  3. When you select the trade, you will see the agent name you have proposed the trade to (empty when this is a community trade), the date and time for when the trade is requested, the status and a comment (if added in the request).
  4. When you have sent a request for a community trade, you are able to choose one of the responded agents, choose the best option for you, select Accept.
  5. You can add a comment.
  6. The status can be (grey) Open, (yellow) In Review (with supervisor), (green) Confirmed and (red) Cancelled.
  7. When the trade is confirmed, the schedule is changed automatically.

In the Trade menu you are able to view the requested Personal trade proposals from other agents to you:

  1. When another agent requests a personal trade with you, this will be shown within Personal (at the bottom of the screen).
  2. The name of the requested agent, date and time of the shift, status and comment are shown.
  3. You can Accept or Reject the trade request.
  4. By clicking Accept or Reject you have the option to add a comment.
  5. The status is changed based on the choice you have made.
  6. The status can be (grey) Open, (yellow) In Review (with supervisor), (green) Confirmed, and (red) Cancelled.
  7. When the trade is confirmed, the schedule is changed automatically.

In the Trade menu you are able to view the requested Community trade proposals:

  1. When another agent requests a community trade, this will be shown within Community (at the bottom of the screen).
  2. The lines which are colored grey have the status Open, for these requests you are able to reply.
  3. Open the line to which you want to reply.
  4. The name of the requesting agent, date and time of the shift, status and comment are shown.
  5. You can Accept the trade request. By clicking on Accept you have the option to add a comment.
  6. A line will be added to the request. This line contains your shift time and comment. The bullet in front of your name is green as you have accepted the request.
  7. The requesting agent is able to choose one of the responded agents to confirm the trade with.


Time Off

To view requested Time-Off:

  1. Under the Time-Off section, navigate in the calendar to the date the Time-Off has been requested.
  2. The day, date and status are shown at the bottom of the screen.
  3. You are able to View, Edit, Recall or Delete the requested Time-Off

To view your Time Off balance:

  1. Select the relevant time off type you would like to know your balance for under Please select time off type.
  2. Your balance will be displayed underneath based on the date you have selected.

You can request Time-Off through the Time-Off menu, in the Home screen or from the Schedule:

Steps to request Time-Off from your “Schedule” view:

  1. Select a specific day within the calendar, the detailed shift information of that day is shown.
  2. At the right top click on Time Off.

Steps to request Time-Off from the Time-Off section in the app:

  1. Navigate in the calendar to the desired month and select the first day of the desired Time-Off.
  2. Click on the “+” button at the top of the screen.

The following steps will be the same if you started the request from either the schedule view or time off section.

  1. Select the time-off type (per day), at the top.
  2. Select the day(s) you want to request Time-Off, and click on Proceed.  NOTE: If the days you want to select are greyed out, then the time-off rules prevent you from booking those days.  Contact your supervisor.
  3. Here you will be able to see the time-off limits.  If the time-slot shows as red, then the limits have been met and you will join a wait-list (if the wait-list is activated in your Genesys WFM environment).
  4. Select the Full day selector (yes/no). If you do not require a full day, then you need to enter a start and end time for a part-day.
  5. Select Paid time selector (yes/no) to add the paid hours.
  6. You can add comments (optional), by clicking on the comments line the keyboard will become available.
  7. Follow the same steps for all the days you have requested if you have selected more than one.
  8. Click on Send.

Notifications

To view notifications: 

In the Home screen, the number of unread notifications are displayed in a green circle beside Notifications.

  1. To view notifications either go to Menu > Notifications or click on Notifications on the Home screen.
  2. You are able to see different types of notifications, these types are based on the choices you have made within the Settings menu (described in the Settings FAQ).

Information within the notifications:

  • Schedule notifications – schedule modifications/published.
  • Time Off notifications – the status of a requested Time Off.
  • Trade notifications – the status of a Trade you have requested or replied to.
  • Komyunity Notifications will be sent from your Supervisor/Planner

The notifications in bold are unread.

By clicking on an individual notification, you will be taken to the area in the app the notification is related to.

Settings

To configure the personal settings in the Komyunity app the user needs to fill in:

Contact details:

  1. By clicking on the line Phone you can set your phone number.
  2. By clicking on the line E-mail you can set your E-mail.
  3. Click on the camera icon to pick or take a photo.

Preferred way of contact: 

When a supervisor needs to contact you, you can set your preferred method of contact:

  1. Click on each (1st, 2nd, 3rd) line to select E-mail, Mobile Phone or SMS.
  2. Click Done to confirm your choice.

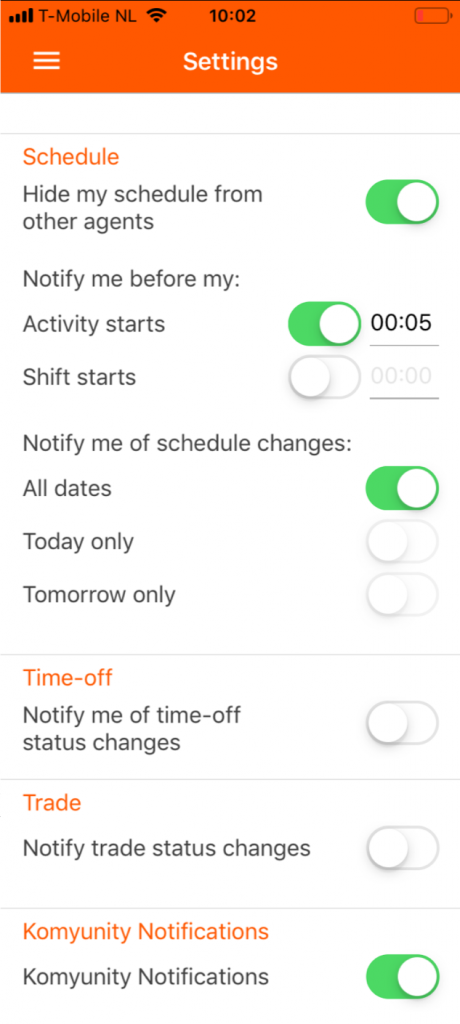
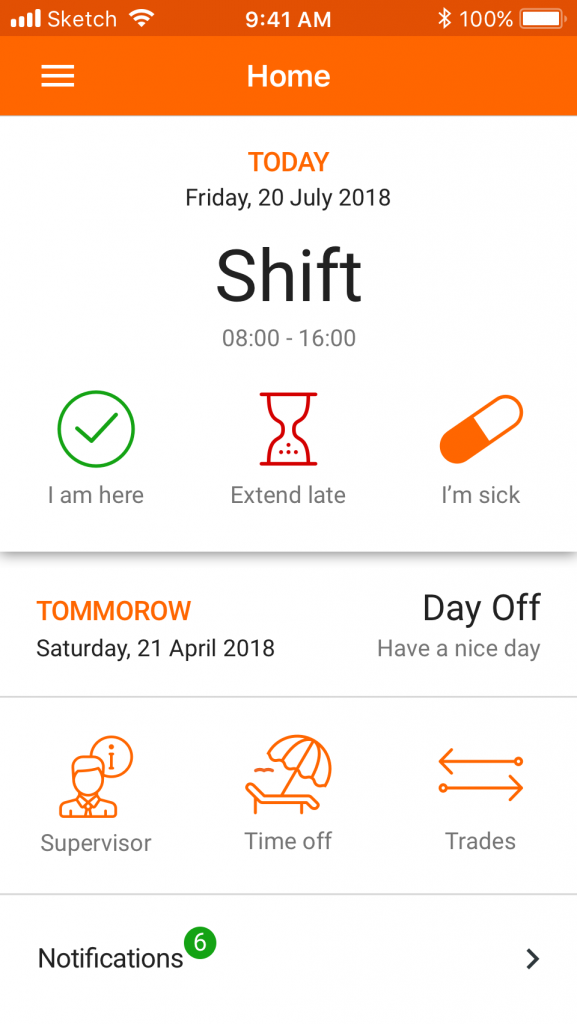
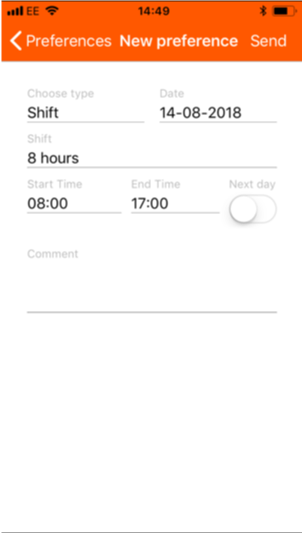
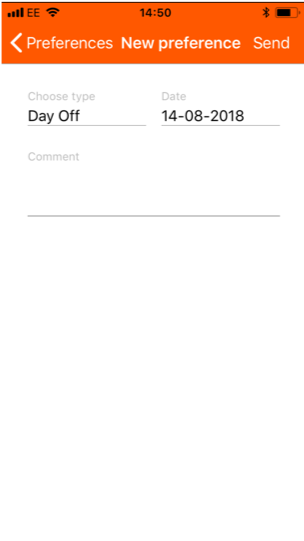
Setting schedule preferences:

Hide my schedule from other agents – When you don’t want to have your detailed schedule visible to other agents, for trading and viewing purposes, you need to slide the button to green.  With this option selected, other agents will only be able to see your shift start and end time.

Notify me before my:

  • Activity starts = slide button to green and select the number of minutes you want a notification before an activity starts.  For example, a notify me 10 minutes before my break starts.
  • Shift starts = slide button to green and select the number of minutes you want a notification before my shift starts.

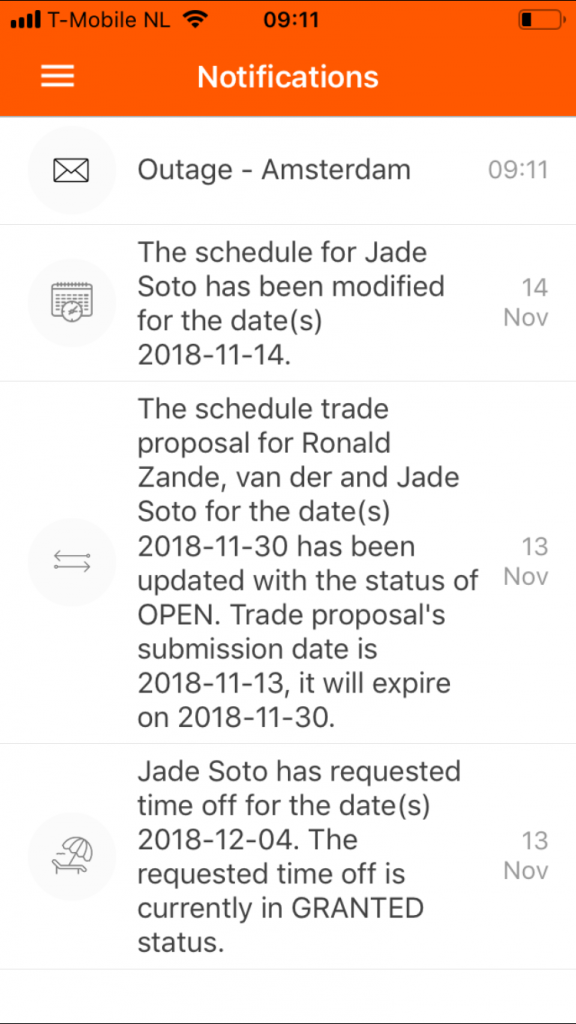
To set how you want to receive Notifications: 

In this section, you can select for which kind of changes you want to receive notifications for.

  1. By sliding the button to green you will activate the notifications for Schedule changes, Time Off and Trade changes.
  2. Komyunity Notifications are for any messages sent from your Supervisor/Planner.  It is recommended that you keep these activated.