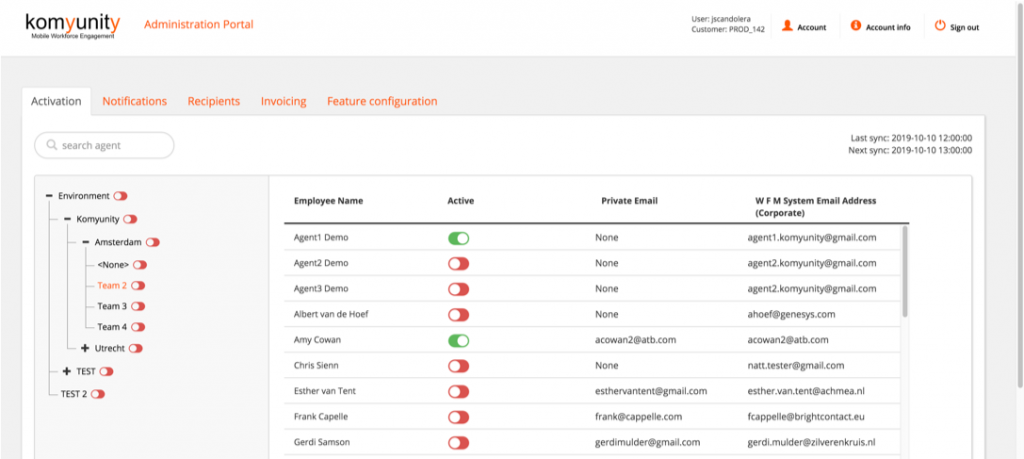
In the Activation tab, you can activate users by tenant, site, team or agent level.
Simply slide the button to green to activate an agent(s).
In the Activation tab, you can activate users by tenant, site, team or agent level.
Simply slide the button to green to activate an agent(s).
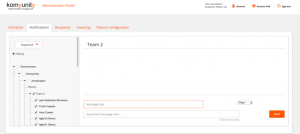
In the Notifications tab, you can send free-format notifications by tenant, site, team or agent level.
Expand the tree to the level you want to send the message to. For example, if you select a team the notification will go to all agents in that team.
Enter a Message title and the message text.
From the drop-down box, select the type:
Click Send
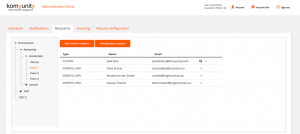
In the Recipients tab, you can set who should receive the emails when an agent reports late or sick, or requests an exception.
Expand the tree to the level you would like to set the recipient for. For example, if you select a team the email will go to all recipients configured for that team.
Recipients can be set by Business Unit, site or team.
For an existing Genesys user, click on the Add genesys recipient button and it will display all the Genesys users configured in WFM.
Select the user you want to assign, and click Save.
To add a non-Genesys user, click on the Add custom recipient button, and enter a first name, last name, email and click Save.
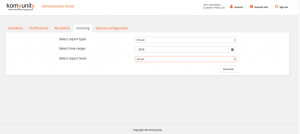
In the Invoicing tab, you can run reports to see how many agents are activated to use the Komyunity app.
Under report type select the aggregation for the report.
Under time range select the month/year.
Under report level select the tree level you want to run the report for:
Click on Generate.
The report will be saved to your default download folder.
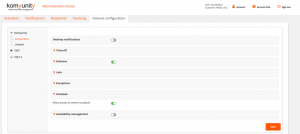
In the Feature configuration tab, you configure how you would like your Komyunity solution to update the Genesys WFM schedule.
You can set the configuration by Site only.
The features that can be set are:

In the Desktop notifications section, simply slide the button to green to activate this.
NOTE: This is only available if you have purchased this add-on.
Expand the Time-off section, and activate the relevant settings:
Mandatory paid time-off = agents will only be able to take paid time-off. Unpaid time-off will be over-written with paid hours.
Allow enter full day start end = Set this option value to disabled to disable an agent’s ability to specify the start and end of a full-day time off. Omit this option or set the value to activate to enable that ability. This should match your configuration of the options in your Genesys WFM Web Server.
Allow enter paid time = Controls whether an agent can specify the number of paid hours to deduct, when creating or editing a full-day time-off request in the Time Off Request view. This should match your configuration of the options in your Genesys WFM Web Server.
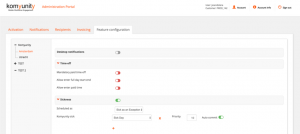
Expand the Sickness section, and activate the relevant settings:
Scheduled as = Select if you want to schedule Sick as an exception or Time-off type.
Under Komyunity sick = Select what exceptions or time-off types you want the agent to be able to enter in the app as sickness.
If you set it as an exception, enter a Priority, and how sickness should be entered into the schedule:
Auto-commit set to green means that the sickness exception will be entered into the master schedule for that agent.
Auto-commit set to red means that the request will go to the Master Schedule Changes Approval page for a supervisor to accept it before it is updated in the master schedule.
If you set it as a Time-off type, then set ignore warnings.
Sickness as a time-off type will always go to the Calendar in WFM and you may be required to update the schedule from the calendar.

Expand the Late section, and activate the relevant settings:
Under Komyunity late = Select what exception will be entered as Late in the schedule for the agent.
Enter a Priority, and how late should be entered into the schedule:
Auto-commit set to green means that the sickness exception will be entered into the master schedule for that agent.
Auto-commit set to red means that the request will go to the Master Schedule Changes Approval page for a supervisor to accept it before it is updated in the master schedule.
Using the + enter the time intervals you want the agent to be able to report as late.
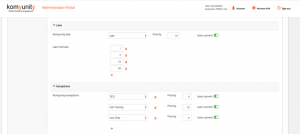
Expand the Exceptions section, and activate the relevant settings:
Under Komyunity exceptions = Select what exceptions the agent will be able to request in the app.
Enter a Priority for each exception, and how exceptions should be entered into the schedule:
Auto-commit set to green means that the sickness exception will be entered into the master schedule for that agent.
Auto-commit set to red means that the request will go to the Master Schedule Changes Approval page for a supervisor to accept it before it is updated in the master schedule.
Using the + enter as many exceptions needed.

Expand the Schedule section, and slide the button to green to activate.
Allow access to others schedule = If this option value is activated, agents can see other agents’ schedules in the Show agents schedules section of the app in the Schedule view. If this is de-activated the agents can only see that start and end time of other agents.
Availability management section is a future enhancement. Not available at the moment.